If you’re utilizing your Raspberry Pi as a residence server, or require to have its control remotely from a different machine, appointing a static IP address for it is an extremely useful concept. This implies you’ll be capable to see it at the exact Raspberry Pi set IP every moment, instead of a unique lesson living fixed dynamically anytime it is restarted. This can also come in handy if you have numerous Raspberry Pi machines linked to your personal network.
Surprisingly, once you get to know how making a static IP address for your Raspberry Pi is a relatively easy and fast procedure. In this tutorial, we’ll guide you on how to make your Raspberry Pi’s IP address endless. For our complete guide, on how to find your IP address click on the hyperlink.
What Is an IP Address?

All devices on a network, or the internet as a whole, has an (IP) address that distinguishes them from all others. That will be discussed further in the section about network addresses.
The IP is usually expressed as a series of 4 decimal digits, ranging from 0 to 255 with dots separating them.
Your Raspberry Pi’s IP is reconfigured every time automatically you turn it on, so it can reasonably alter by default in the Raspberry Pi OS.
Obviously, this isn’t desirable if you require a consistent address to link to the Raspberry Pi from a different machine, such as for use as a server. As a result, it’s best to configure your Raspberry Pi with a static IP address.
How to assign a static IP address on raspberry pi?

We’ll be using the Raspbian OS in this guide. On other operating systems, you might not be able to utilize these instructions to establish a fixed IP address.
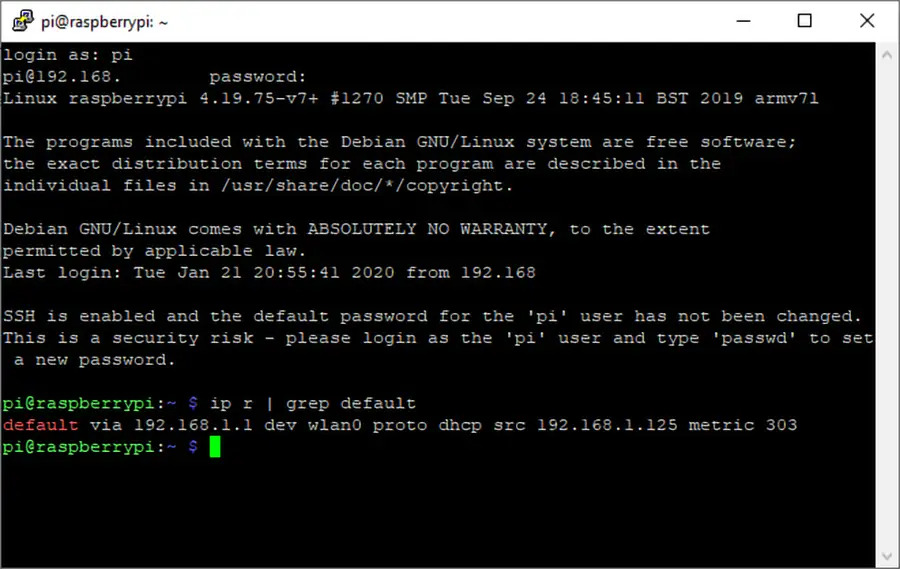
1. We’ll begin with configuring a static IP address on our Raspberry Pi by obtaining details regarding our existing network configuration.
Let’s start with a look at what the router currently is for your network. To do so, run the subsequent command:
IP r | grep default
You must get an outcome identical to the one below when you use this command. Make a note of the first IP address in this sequence.
default via 192.168.0.1 dev eth0 proto dhcp src 192.168.0.159 metric 202
Let’s take a look at the example command again: “Router IP Address”: “192.168.0.1”
2. To finish, let’s get the current DNS server as well.
To do this, we must open the “resolv.conf” configuration file with the subsequent command.
sudo nano /etc/resolv.conf
The following lines of text should appear after using this command.
Make a note of the IP address next to “nameserver.” This is the name server that we’ll use in our next several actions.
3. The command below allows us to modify the “dhcpcd.conf” configuration file after we have obtained both our current “router” IP and nameserver IPs.
We can instruct the Raspberry Pi to use a different network configuration by editing this config file.
sudo nano /etc/dhcpcd.conf
4. To begin, you must pick whether to assign a static IP address to your “eth0” (Ethernet cable) connector or your “wlan0” (WiFi) connection. Choose one and change the “<NETWORK>” text with it.
Make certain that “<STATICIP>” is replaced with the IP address you want to give your Raspberry Pi. Keep in mind that this isn’t a static IP that might be paired with a different device on your network.
- Replace “<ROUTERIP>” with the IP address you obtained in step 1 of this tutorial.
- Ultimately, substitute “DNSIP” with the IP address of the domain name server you want to use.
interface <NETWORK>
static ip_address=<STATICIP>/24
static routers=<ROUTERIP>
static domain_name_servers=<DNSIP>
5. We’ll restart the Raspberry Pi now that we’ve updated our DHCP configuration file to use a static IP address.
Restarting the Raspberry Pi will allow us to load in our settings modifications and erase the old ones. The Raspberry Pi will try to link to the router utilizing the static IP address we set in our “dhcpd.conf” file if it is switched on and then rebooted.
Use the subsequent command to reboot your Raspberry Pi.
sudo reboot
Find your Router IP address

Please type in the following details: IP address and name server IP of your router. By executing a few commands in a terminal on the Pi, we may obtain this information. Open a terminal window from the Raspberry Pi OS or connect to it using SSH.
To discover your router’s IP address, type the subsequent command:
ip r | grep default
After the text “default via,” the router IP address will appear. Keep it in mind. The name server may be found in the resolv.conf file. Use the following command to open it.
sudo nano /etc/resolv.conf
Close the text file with CTRL+X and take note of the name server IP address.
DHCP configuration
To set the static IP, add it to a file on the Raspberry Pi. In the terminal, use this command to modify the dhcpcd.conf file:
sudo nano /etc/dhcpcd.conf
Restart the raspberry pi
Reboot your Raspberry Pi to implement the changes and assign it a static IP address.
sudo reboot
The Raspberry Pi is not going to now try to link to the router utilizing the new static IP that you specified in the dhcpcd.conf file, rather than relying on an automatically assigned DHCP address.
Type in the following command to ensure that it’s operating properly:
hostname -I
You must currently see the static IP address you specified in the dhcpcd.conf file.
Frequently asked questions

Does my Raspberry Pi have a static IP?
Does my Raspberry Pi have a static IP?
How to Find the Current IP Address of a Raspberry Pi?
Conclusion
You’ve successfully configured a static IP address on your Raspberry Pi, and it must support that address when it boots up now. Currently, you can utilize your Pi design as a media, NAS, or gaming server, and link to it securely every time at the exact Raspberry Pi specified IP address.