In this blog post, we will be walking you through the steps of how to set a static IP address on your PC using Windows 11. This is an important process for anyone looking to transfer files or printers on a local network. Having a static IP address ensures that your computer will always have the same IP address, which can help prevent connection issues. Let’s get started!
When a PC links to the network, it generally acquires a dynamic IP address given by the local (DHCP) server. The issue is that this formatting may change at any moment, as soon as you reboot the pc or after the configurations have passed, and this might force services like remote desktop port forwarding to cease functioning.
The settings of a static network are consistently the same, creating it perfect for hosting services that different users can use through the network.
This tutorial will show you how to set a static IP address on Windows 11.
NOTE: For more details on IP addresses please have a look at our guide on how to find your IP address.
Assign a static IP address on Windows 11 using Command Prompt

On Windows 11, the quickest approach to set up a static IP address is with Command Prompt. Set a static IP address on Windows 11 with the Command Prompt:
- Look for Command Prompt CMD, and open it as an administrator.
- To inspect your current networking configuration, type the following command and hit Enter: ipconfig /all
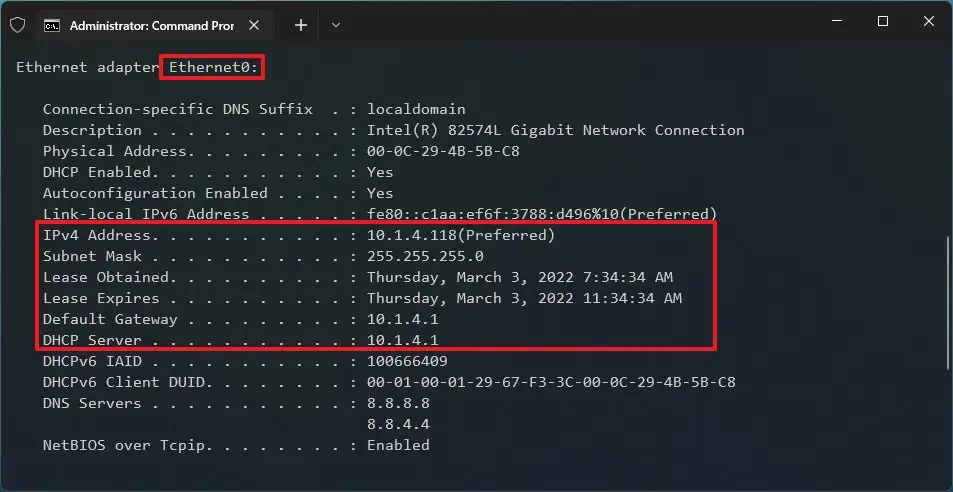
- The name of the network interface and its manufacturer, as well as the following information, should be noted under the network adapter:
- IPv4
- Subnet mask
- Default Gateway
- DNS Servers
On a Windows 11 computer, use the following command to assign a static IP address and press Enter:netsh interface IP set address name=” Ethernet0″ static 10.1.4.119 255.255.255.0 10.1.4.1
- Replace Ethernet0 with the name of your network adapter in the following command: Set the device IP address, subnet mask, and default gateway address to 10.1.4.119 with the corresponding local area network settings.
- Set the DNS server address using the following command:netsh interface IP set DNS name=” Ethernet0″ static 10.1.4.1
- In the command, make sure to replace Ethernet0 with your adapter’s name and 10.1.4.1 with the DNS server address of the network.
- To change the DNS server address, use this command:netsh interface IP add DNS name=” Ethernet0″ 8.8.8.8 index=2
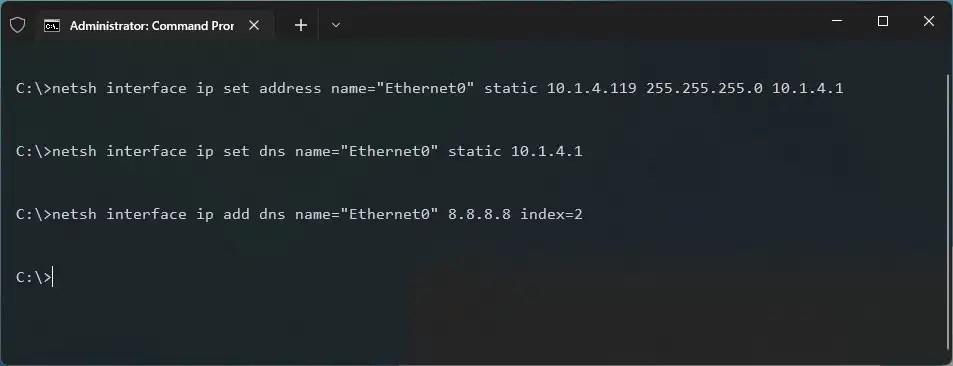
- Replace Ethernet0 with the name of your adapter and 8.8.8.8 with a different DNS server address in the command below.
Assign a static IP address on Windows 11 using PowerShell

It is also possible to use PowerShell with the “NetTCPIP” module to manage networking settings, including changing the IP address settings to a static configuration.
Using the below steps, you may quickly and simply set a static IP address with PowerShell:
- Open the Start menu.
- Look for PowerShell and run it with administrator rights.
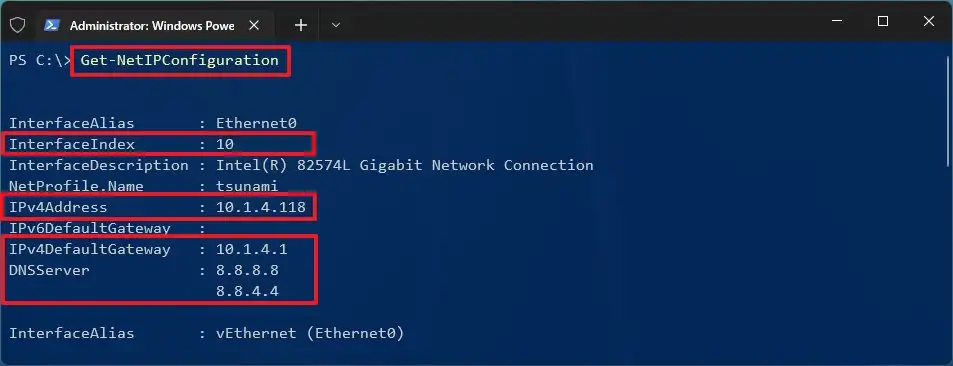
- Type the below command to check your current network.
Get-NetIPConfiguration
- Confirm the following network information:
- InterfaceIndex
- IPv4Address
- IPv4DefaultGateway
- DNSServer
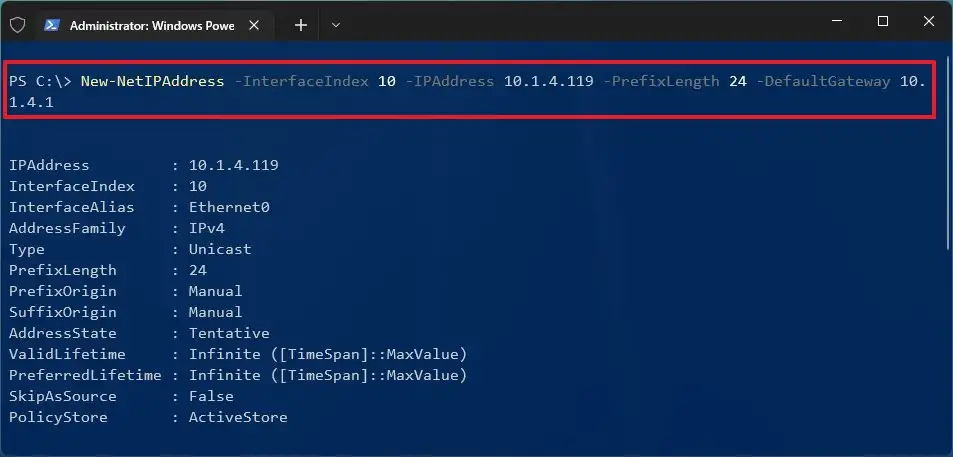
To create a static IP address, type the following line: -> To set a static IP address, enter the line below: New-NetIPAddress -InterfaceIndex 10 -IPAddress 10.1.4.119 -PrefixLength 24 -DefaultGateway 10.1.4.1
- Replace the InterfaceIndex number (10) in the following command with the number of your adapter: In the Configuration window, click on IP address. To link your device’s static IP address with the dynamic IP address you’ll use in-game, type an IP Address and press ENTER. In the example, you must double-check that the mask value is correct. If necessary, modify PrefixLength (subnet mask) to match the correct bit number. On a home network, the value should be 24. Also, update the DefaultGateway option with the network’s default gateway address.
- Type the command below to assign a DNS server:
Set-DnsClientServerAddress -InterfaceIndex 10 -ServerAddresses 10.1.4.1

You may use a comma to set a secondary DNS server address, as in the following example: Set-DnsClientServerAddress -InterfaceIndex 10 -ServerAddresses 10.1.4.1, 8.8.8.8
Replace the InterfaceIndex number (10) in the command with the number of your network adapter. Also, replace ServerAddresses with the DNS IP address.
After you’ve completed the procedures, the network configuration will be applied to the computer. Assign a TCP/IP address in the network range and outside of the DHCP server scope to allow for proper connection and avoid configuration conflicts, regardless of the approach you take. Multiple computers sharing the same address will create confusion, preventing them from establishing a connection to the internet.
Assign a static IP address on Windows 11 using Settings

Using the Settings app on Windows 11, you may change the wireless and wired adapter settings.
Set the static IP address on the Wi-Fi adapter
To configure a Wi-Fi adapter with a static IP address, do the following:
- On Windows 11, go to Settings and change the File Types option.
- Go to the Settings icon and click on Network & Internet.
- Select the Wifi option.
- Select the active network connection.
- Click the Edit button under “IP settings.”
- Select the Manual option and then press the right arrow key.
- Turn the IPv4 toggle switch on.
- For Windows 11, use a static IP address, such as 10.1.4.119.
- Enter the length of a subnet’s prefix, often expressed as two numbers separated by dashes (for example, 255.255.255.0).
- Provide a default gateway address.
- Specify a Preferred DNS address (required).
- Specify an Alternate DNS address.
- Finally, save.
When you click the Finish button, your computer will be assigned a static network configuration. If you’ve changed your password, go to a website in your browser and verify the new settings.
Set the static IP address on the Ethernet adapter
On Windows 11, you may use these instructions to set a fixed IP address for an Ethernet (wired) adaptor:
- Open Settings App.
- Click on Network & Internet to open the window.
- Click the Ethernet Option.
- To change your IP address, go to the “IP settings” section and select “Edit.”
- Choose option “Manual”.
- Turn the IPv4 toggle switch on.
- Create a static IP address for Windows 11, such as 10.1.4.119 (or anything you like).
- Specify the subnet mask
- Enter a Default Gateway address.
- Select a Preferred DNS Address.
- To enable DNS over HTTPS (DoH) encryption, use the “Preferred DNS encryption” option and pick “Encrypted only (DNS over HTTPS).”
- You may either use an existing DNS address or create a new one.
- Then click the Save button.
You can test your settings by visiting a website in your browser after you’ve completed the steps.
Assign a static IP address on Windows 11 using Control Panel

You can still change the IP settings for Ethernet or Wi-Fi adapters on Windows 11 using Control Panel.
Make sure that any non-primary components are removed from the Control Panel. Follow these steps to update your IP address configuration:
- Click on Start and then Control Panel.
- Go to the bottom of the page and click on Network and Internet.
- To access this menu, click the Network and Sharing Center button.
- Select the Change adapter settings option from the left navigation pane.
- Select the Properties option from right-click menu on the network adapter.
- Select the Internet Protocol Version 4 (TCP/IPv4) option.
- Select the Properties option from the drop-down menu.
- Select the option Use the following IP address.
- Set the static IP address to be 10.1.4.119, for example.
- Enter a Subnet mask in the box. On a home network, the subnet mask is generally 255.255.255.0.
- If your router supports a dynamic IP address, you must provide the following:. . . -> Set up a default gateway address – for example, 10.1.4.1 (Usually, your router’s address).
- Under the “Use the following DNS server addresses” section, use your router’s IP address or a server IP address that provides DNS resolutions (for example, 10.1.4.1) as the Preferred DNS server address.
- If the client computer is unable to connect to the preferred DNS server, provide a second DNS server that it can use instead.
- Then click on OK.
You can check whether the configuration works by opening a browser and loading a website.
If you want to reverse the changes, follow these instructions for changing a dynamic IP address on Windows 11.
What can you do with a static IP address?
DNS names, on the other hand, are only required for devices with a static IP address. For example, if your computer is set up as a server, such as an FTP or web server, you’ll need a static IP address. If you want people to be able to always access your computer to download files, set the IP address to a static, never-changing value.
If the server was given a dynamic IP address, it would rapidly change, preventing your router from distinguishing which machine on the network is the server.
Setting up the computer to use a static IP address allows you to access your home or work computer when you’re on vacation or at home without having to worry about the address changing and blocking your access.
Another case where a static IP address would be beneficial is with a shared printer. If you have a printer that everyone in your home or business needs to share, give it a fixed IP address that won’t change. Then, any computer may connect to the printer simply by using its IP address (the network’s identification number) and no other information. Because the address does not vary, those connections will never be lost because they can always be accessed via the IP address.
Frequently asked questions
How do I set a static IP address in Windows 10?
Can I have two IP addresses on one computer?
Conclusion
In this guide on How to set a static IP address on pc using windows 11, we have mentioned 4 different ways in which you can easily set a static IP address on your windows 11 pc. You can go with any of the methods whichever you find easier.